Guide is a simple tool in Matlab to swiftly create custom GUIs. Its a GUI to create a GUI, but needs some coding to get it working. In today’s blog I’ll show how to make some simple GUIs with Guide. Once you get the gist of the technique you will be playing around with GUIs in no time.
Type guide at the Matlab prompt and choose blank template at the query. The interface you see should like the one below.
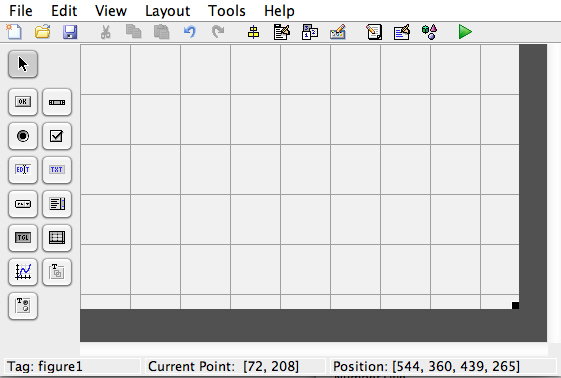
The panel on the left shows you all the various kinds of objects you can create in a Matlab GUI viz., pushbuttons, togglebuttons, radiobuttons, edit fields, text strings, checkboxes, axes, dropdown/popup menu, listboxes, tables, sliderbars, and a panel to create groups of these objects. To keep it simple, I’ll demonstrate building a GUI for a basic task like multiplying two numbers, say speed and time to yield distance.
Creating the interface should be just drag-and-drop task. To edit the strings on the objects, double-click on them to open up property-inspector. Change the value of field called “string” from the default one to the one you want.
![]()
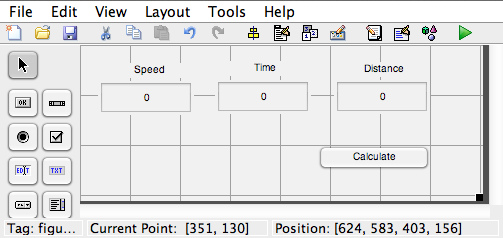
So I ‘ve 3 edit-fields, 3 static-texts, and a pushbutton as shown below. As user enters numbers in speed and time edit fields and pushes the pushbutton, the distance value is calculated and displayed. These are the objects, their tags and values in my GUI:
|
Object |
Tag |
Value/string |
|
Text string for SPEED |
text1 |
Speed |
|
Text string for TIME |
text2 |
Time |
|
Text string for DISTANCE |
text3 |
Distance |
|
Edit field for SPEED |
edit1 |
0 |
|
Edit field for TIME |
edit2 |
0 |
|
Edit field for DISTANCE |
edit3 |
0 |
|
Pushbutton |
pushbutton1 |
Calculate |
Now save the gui with a valid name and run it. You would be seeing the interface with the objects you put. Also notice that Matlab creates two files with the filename you used – a .fig file and an .m file. You may try using the GUI but it doesn’t yet work. That’s because although the objects exist they haven’t been programmed to communicate with each other, which will be the next task.
To understand how GUIs work in Matlab one must understand two things. First, graphics in Matlab are managed by means of what are called handles. Every window/interface that Matlab creates gets a handle. E.g. your main Matlab window has the handle 0 (numeric zero). Handles (as of 2013a) can be positive integers or fractions (it can be controlled if an object should get an integer handle). Think of handles as addresses for graphical objects. Second, GUI objects are associated with event functions which are automatically invoked when an event occurs. E.g. clicking on a pushbutton, changing value in a text field, toggling a toggle button, switching a radio button, etc are all events that trigger execution of a designated function called “callback function”. It’s the callback functions that pour life into a GUI. When you create an object in your GUI using Guide, Matlab automatically creates a placeholder template in the m-file for callback linked to the object. The name of the callback function will bear the tag of the object. E.g. for an object with tag “pushbutton1″ you will see a function with definition function pushbutton1_Callback(hobject,eventdata,handles) .
This function is automatically invoked when pushbutton1 of the GUI is clicked on. Hence, whatever action the function is coded to carry out will be performed. During the callback hobject will have handle to the object whose callback is being executed, which is a very handy thing to have. eventdata is blank and left unused often, and handles is a structure containing handles of all the objects placed in the GUI. E.g. handles.pushbutton1 will have handle to the object with tag pushbutton1.
In our example, we need only one action: to calculate the product of the numbers and display inside the edit field corresponding to ‘Distance’, when user clicks on the “Calculate” pushbutton. We will hence define only the pushbutton’s callback function. In the m-file, scroll down to locate pushbutton1_Callback and place the following code.
function pushbutton1_Callback(hObject, eventdata, handles)

speed_string = get(handles.edit1,'value');

time_string = get(handles.edit2,'value');

speed_val = str2double(speed_str);

time_val = str2double(time_str);

distance_val = speed_val * time_val;

distance_string = num2str(distance_val);

set(handles.edit3,distance_string);
get function fetches value of a particular property of the object specified by the field. Its syntax is get(handle,’property_name’). In the above code, we are fetching the strings in the two edit fields, converting them to numbers and multiplying them. Conversion to numbers can be done by str2double or str2num. Then we use put function to write a value to the specified property with the following syntax - put(handle,’property_name’,'value’). Note that value is in quotes only if the property takes a string rather than a number as is the case with text edit fields, static texts, pushbuttons, etc. In case of radiobuttons and checkboxes value is either 0 or 1 denoting whether or not the button is OFF or ON.
As the callback finishes execution, the GUI has new string in the distance field. Note that we didn’t bother about callback functions for edit fields which are invoked when user changes value in the field. For a novice, it would be a good exercise to enhance the above GUI to update the distance field as soon as user changes value in speed or time field. Such a design obviates “Calculate” pushbutton.
You might also see a lot of other placeholders functions created in the m file like createfunctions, etc which are automatically created by GUI. If you don’t intend to use them, you can get rid of them by deleting their references in property inspector, but deleting them from m-file directly is a bad idea. This is one of the drawbacks of Guide – it messes up m-file quite a bit. Guide is good in cases where you anticipate your GUI to continuously evolve in design and is has moderate complexity. Guide is a nice, expedites GUI design & layout, but is still a clumsy tool. GUIs created by it tend to be slightly slower in response compared to those created manually. I’d prefer to use Guide to quickly show my client the concept but would avoid it in cases of very complex GUIs with a lot of objects or where the specs/requirements aren’t changing. Creating GUIs without Guide involves creating the figure, objects, etc manually using functions like uicontrol. Planning a GUI layout with manual design could be time-consuming, needs some patience and practice and is worth only if the GUI is too complex for Guide to handle.
I would be happy to answer your questions on Guide/GUIs. How do you design your GUIs? Share your experiences, tips for our readers. Leave a question/comment below.
This is one awesome article post. Cool.
Thanks.
“Say, you got a nice article post.Truly thank you! Really Great.”
I have a .m file that runs a stopwatch.
How can I call up ‘stopwatch’ to appear and run in a handle.axes window within a GUI?
So far, I can call ‘stopwatch’ but it will not appear in the axes location.
I’ve tried code such as (uiget(‘stopwatch’, ‘Border’, handles.axes4)) to no avail.
Much appreciated.
Paul
@ Paul: Look at the stopwatch thats implemented here. This clock uses static text. Not sure, if you really want to implement this stopwatch on axes, but in case you do, you need to use text() in the current axes (gca/gcf) inside the stopwatch function. I don’t think uiget is relevant here.
Thank you for the prompt response and the stopwatch you recommend is much better than mine.
To explain why I tried placing the timer in axes is to keep it visible. Presently, whenever I click on a GUI command, the stopwatch disappears behind the GUI. It needs to stay on top, and visible.
If you have time, would you mind showing how and where to (a) use text() in the stopwatch function, or (b) offer another technique to keep the stopwatch on the top layer and visible.
Hope I am not too much trouble.
You might be overlaying one component on another in your GUI or if one component dynamically grows during an operation make sure that the clock text is placed away from the dynamic component’s estate. I would recommend you to do it in a style similar to the code in link earlier mentioned. It works.
To answer your question of putting text on axes (say e.g. in the linked code), you will first make DISPLAY as an axes rather than static text and overlay text using text().
DISPLAY = axes(‘parent’,hfig,’units’,'pixels’,'Position’,[10 45 330 55]);
When initialising the timer, create the display text as
TXT = text(0.1,0.5,str,’parent’,DISPLAY);
Everytime the timer increments, you shouldn’t use text() as it creates a new string without erasing the old one. Rather reuse the existing one by updating TXT as
set(TXT,’string’,str);
Perfect. It works fine.
Thank you and all the best in the upcoming holidays!
Hi! I would like to make a GUI to manage a Stateflow Chart. The Chart has 3 input events: ON,OFF and AWAKEN. The last one awakes the chart to start running. I want the GUI to have 3 buttons to do it, but I don’t know how to design the .m file to broadcast events.
Can you help me? Thanks anyway!
You may perhaps try monitoring a variable (a global one) in sf chart to trigger an event, while the variable is set/reset upon pushbutton clicks in Gui.